Friday, September 23, 2011

Au contraire, real men do eat quiche.

They just need a little nudge! I used to have quiche for lunch while working in Montreal. There was a little restaurant just around the corner from where my meetings were usually held, that served many kinds of quiche. It was just perfect for lunch to have a slice of quiche and a small salad. The variety also helped: you're not going to have the same flavor twice in a work week. It's filling, without being heavy, and you can consider it a one dish meal. To prove that the saying, that men don't eat quiche, is just a myth, I learned to make quiche from a male friend. He gave me a recipe for a salmon quiche, that I subsequently tweaked a little to make it lighter. To be honest, in the beginning, my husband was not very happy about quiche, but once he realized that, after all, a quiche is basically an omelet served in its own "bread", he came around. On the other hand, quiche is one of my mother favorite foods. While the original recipe calls for cream and butter, I managed to get very good results with regular milk, even skim milk. It is a lot lighter, but you'll never notice the difference. You can serve it at lunch, or brunch, especially when you make 2 or 3 quiches with different fillings. In fact, the basic ingredients are the same, but I change the main filling. I use 1 cup of liquid, starting with heavy cream and go down to skim milk, plus 2 eggs and 1/2 cup of grated Parmigiano. Then add whatever you like to your quiche. To make it easier, I usually get a 3 crust package, frozen. If you prefer to make it from scratch, go ahead. But, trust me the frozen pies are equally good. Also you have the choice between baking the pie before adding the filling, or just fill the crust and bake the whole thing at once.
So go ahead, have some courage and invite the "real men" in your life to a quiche, they'll love it.
I usually make the 3 pies together, it's easy, more economical, and you'll have many lunches at hand in one cooking day. In my basic recipe I use:
1 pie crust
1 cup skim milk
2 eggs
1/2 cup of grated Parmigiano cheese
You can add cheese as much as you want, any kind you like.

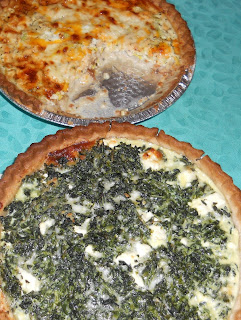
SPINACH AND FETA QUICHE


To the basic recipe add the following:
1 (10 oz) frozen box of chopped spinach
2 large slices of feta cheese
2 scallions, thinly sliced, white part and some green
Salt and pepper

Defrost the spinach, squeeze it to completely drain any liquid from it. Put the spinach in a bowl, add the scallions, and crumble the feta over it. Sprinkle with salt and pepper, and mix. Transfer the mixture into the pie crust. In the same bowl, mix the milk, the eggs and the Parmigiano cheese. Sprinkle a dash of salt and pepper, mix and pour over your pie. Bake in a 375 degree oven until the edges of the crust are golden brown and the filling is settled in the middle of the quiche.
NOTE: If you want, you can cook the spinach and the scallions in a drop of oil before adding them to the pie crust. But the other way is equally fine.

SALMON QUICHE


You'll need:
The basic recipe
1 can (7 oz) salmon
3 stalks of celery, preferably from the heart, leaves included
1 tsp dried oregano
1 cup cheddar cheese
Salt and pepper

Drain the salmon and check to make sure that there are no small bones in it. Finely chop the celery. Put the salmon in a bowl, add the celery, the oregano and the cheddar cheese. Sprinkle with some salt and pepper. Mix, then transfer to the pie crust. Mix the eggs, milk and Parmigiano cheese, with a dash of salt and pepper, then pour over the pie. Bake in a 375 degree oven. Serve with a side salad.

TIP:  If you want other fillings, you can cook some sliced sausage in just a drop of oil, add any kind of grated cheese you like and you're good to go. You can make it with extra cheese, nothing else, or ham and cheese,  or even herbs (parsley, dill, chives), tomatoes or roasted red bell peppers and cheese, the possibilities are endless.
Friday, September 16, 2011

Ancient Foods.

The Egyptian culture has been around for more than 7000 years. The Egyptian people has been living in the same Nile valley with no interruption during all those years. So it's safe to assume that some aspects of this ancient culture never disappeared. One definite aspect of this continuity is food. Why would it change? The people are still growing the same vegetables, raising the same animals, with very little variation. I heard an archaeologist once say that if someone from the Pharaohs era came back to life and went through an Egyptian village, he would not feel the time difference at all. In a way, this may be considered as lack of progress, but this constancy throughout the ages kept the food repertoire almost intact. Strangely enough, the last 10 or 15 years managed to do what 7000 years couldn't even touch. The fast food invasion changed a lot in the Egyptian way of eating. Now fast food chains are popping up everywhere in the country, and the younger generations feel that this is the food of today and are turning their backs on the traditional cuisine. This of course led to rampant obesity and all the ills we are facing here. Unfortunately today's parents are not doing enough to preserve the culture. This is maybe why I try, on my own, to keep some tradition as long as I can and cook what I grew up eating. Even if some of these dishes were not served in our house as often as in other households, time and distance contribute to that nostalgic feeling about these meals.
                                                
Today we're making Kosheri. This is a traditional dish that I guess has been served in Egypt forever. I don't know the origin of the name, but it is eerily close to the word "Kosher". Well, Egypt had always had a large Jewish community, and this could well be a dish inherited from ancient times, traditionally served from one generation to another. What could confirm this theory is that this is a purely vegetarian dish made of rice and lentils with onions, no significant fat added. The additions came much later (tomato and pasta). In our family, we never added pasta as a topping, but my husband, following popular customs, asked for it. So I'll add pasta. I keep it to the minimum and have some extra, in case someone else wants some more. You'll need:

2 cups of rice
2 cups of green lentils
1 cup of small pasta (elbows)
1 large onion
1 can (14.5 oz) tomato sauce
3 tsp ghee or butter
1 tbsp vegetable or canola oil
2 tbsp vinegar
Hot sauce, Tabasco, optional

I don't usually boil rice, and in this case I should not. The traditional recipe calls for boiling the rice and cooking the onion in 3 tbsp of ghee or butter. But since I intend to caramelize the onion in less than 1 tbsp of oil, I prefer to cook the rice in some butter or ghee. This is the only fat we'll add to the dish.
Rinse and drain the rice several times. In a nonstick pot large enough to hold the cooked rice and lentils (at least 4 or 5 qt) melt 2 tsp ghee or butter, and add the rice. Stir several times to coat the rice and toast it a little bit. Add water according to the package directions. Add salt to taste. Cover and bring to a boil. When the liquid is absorbed, reduce the heat, stir the rice a couple of times, cover again and let cook until done. In the mean time, rinse and drain the lentils several times. Drain and put them in a pot large enough to have them covered with at least 1 inch of water. Cover and let boil. Add water as needed until it becomes tender. Add salt at the end. Drain. By now the rice is done. Remove from heat and add the cooked drained lentils. Stir to mix.
Slice the onion. Heat 1 tbsp oil in a nonstick skillet. Add the slices of onion with salt and pepper. Let cook stirring occasionally until it's caramelized (it becomes dark brown). Remove the onion to a plate. Drizzle the remaining oil on the rice and stir. Cook the pasta according to the package directions.
To make the sauce: melt the remaining 1 tsp of ghee or butter in a sauce pan. Add the tomato sauce, plus 1/2 the can water. Let cook until the butter comes to the surface. Add salt and pepper and stir. Add the vinegar, stir, then remove from heat.
To serve: put the kosheri in a large platter. Top with the caramelized onion and drizzle some of the sauce. Top with the pasta and drizzle some more tomato sauce. Serve the remaining sauce, and the hot sauce, on the side. Serve with a salad. 
                                                    

Monday, September 12, 2011

Something old, something new..

As I may have told you before, I never ate lamb before I got married. Lamb in Egypt had so much fat, and cooks, as usual, did not trim it all, so for me it was a no no, and I had it banned from the house. Of course they tried to trick me several times and cook it anyway thinking that I wouldn't notice the difference, but every time they tried that, I would come home and smell the lamb at the front door. So my mother stopped trying. Fortunately lamb here is different: if you trim the fat, at least all the visible fat, you get a nice piece of meat that you can cook and not worry about me rejecting it. So, after the first time I've tried lamb, and that's another story about my secret recipe, I managed to have a complete repertoire of lamb dishes that we all enjoy. This is one of those recipes.

LAMB WITH ROASTED BELL PEPPERS AND SUN DRIED TOMATOES

I first made this dish at the end of one summer, when I had a lot of leftover leg of lamb from summer grilling. You just cut the meat in cubes and you're good to go. Of course you can make it from meat you just bought for this dish. Also, it is easy to make with what you have in your kitchen: you can use fresh red bell peppers, fresh tomatoes or canned diced tomatoes. The only adjustment you have to make is in the timing of when you'll add these ingredients. If they are fresh, they should be added at the beginning of the cooking process.
Also you can use stock or a combination of stock and red wine. It's up to you. You'll need:

2 lb boneless lamb, preferably from the leg
3 tbsp flour
1 1/2 cups roasted red bell pepper
1 cup sun dried tomatoes in oil
1/2 cup chopped onion
1 cup beef stock (or 1/2 cup stock and 1/2 cup red wine)
3 tbsp sour cream
2 tbsp fresh flat leaf parsley, chopped
3 sprigs of rosemary, chopped
1 tbsp butter
1 tbsp paprika
Salt and pepper to taste

Trim all fat from the lamb and cut it in cubes, about 1 inch. In a shallow dish, season the flour with salt and pepper and toss the lamb cubes in it to coat them on all sides. Reserve the flour for later. In a large nonstick skillet, heat the butter, and add the chopped onion. Cook, stirring until translucent. Add the lamb and cook over high heat until browned on all sides. Add the paprika and 1/2 to 1 tbsp of the flour you used to coat the lamb. Stir well to combine for 1 or 2 minutes more, until fragrant. Drain the tomatoes from their oil, cut them in large slices and add them to the skillet. (If you are using fresh peppers, add them now). Stir. Deglaze the pan with the wine, stir to incorporate. Gradually add the stock, stirring constantly. Add the rosemary and half of the parsley. Reduce the heat, cover and let simmer for 40 to 45 minutes until the lamb is tender. Remember to stir occasionally because the meat has a tendency to stick to the bottom of the skillet, so don't be fooled by the liquid on the surface. Add the sour cream, stir to fully incorporate. Turn off the heat and let it rest before you transfer it to the serving plate. Serve sprinkled with the remaining parsley.

QUINOA PILAF WITH ONION AND CARROTS

                             
This time I said to myself "Let's try something new with the old lamb recipe". I usually serve the lamb stew with rice or couscous. But today I decided to go for quinoa. I had it sitting in my pantry for a while now. I bought it as usual thinking outside the box, and still I was undecided whether to use it or not. I've had quinoa before at lunch from the health food salad bar. I knew that my mom would be open to suggestions, but what about my husband? I tried it anyway thinking that he had his favorite lamb, and if he doesn't like quinoa, we'll always have pita bread to go with it. It was a success.
Quinoa is a seed, it looks like sesame seeds, but round and smaller, the size of a pin head. It comes from South America and is gluten free. It is an excellent source of protein and a good source of dietary fiber, iron and B vitamins. You can make a larger batch of quinoa, use what you need and refrigerate the rest to use it later in a salad  or as another side dish when you add some more ingredients to it. You have to check the package to know how much liquid you need to add to your quinoa. As usual I didn't boil it, I prefer to make it pilaf, like rice, and add some flavorings to it. You'll need:

2 cups of quinoa
1/2 onion 
1 carrot
4 cups stock (chicken or vegetable)
1 tbsp canola oil
1/2 cup basil leaves for garnish, optional
Salt and pepper to taste

In a food processor, or the small chop chop, pulverize the carrot, then the onion. Heat the oil in a nonstick sauce pan large enough to hold the grains and the 4 cups of liquid. When wilted, add the quinoa and stir to toast for a couple of minutes. Add the liquid and stir. Cover and let boil. When the liquid is absorbed, reduce the heat, stir and fluff  the grains. Cover again and continue cooking on very low heat until the quinoa is tender and fluffy, about 15 minutes. It will be a little chewy and some white spiral-like threads will appear around each grain. Transfer to a platter and sprinkle with thinly sliced basil leaves (you can also use parsley).


Thursday, September 8, 2011

Bizarre but easy foods.

BEEF TONGUE

                                                                                                         
Still thinking outside the box, I came up with two new sources of protein, just to break out of the usual beef/chicken/fish cycle. Always faithful to the principle of buying what's fresh in the market, I didn't hesitate for one second when I found beef tongue at the store. I love tongue, so I knew for a fact that this one will be a success. I never had to cook it before, I always relied on my aunts for that. When I first came to New York, I used to get a delicious smoked tongue that you only had to boil and serve. Then it disappeared from the markets. So this one will have to do. This is the first time I have to deal with fresh beef tongue. But I'm not intimidated. The traditional recipe is very easy: you only need time to fully cook the tongue. So I checked out the recipe, and decided to tweak it a little bit. You'll need:

1 whole beef tongue
1 medium onion
3 cardamom pods
4 cloves
2 bay leaves
2 tsp celery salt
Salt and pepper

Rinse the tongue and put it in a pot large enough to have it covered with water. Bring to a boil. Drain and discard the water. Rinse the tongue again, clean the pot and fill it with water. Return the tongue to the pot, cover and bring to a boil. Add all the other ingredients. Keep the pot boiling over medium heat. You can keep the pot half covered for at least 2 1/2 hours. (The bigger the tongue, the longer it will take to cook). Every now and then check the pot: add water if it needs, and turn the tongue on the other side. When the tongue is tender, it's ready. Remove it from the pot to a platter. Discard the water. When it's cooled enough to handle, remove the skin. If it is really well done, it will come out easily when you pull it with your fingers. At this stage some cooks like to brown it whole in some butter. If you'd like that, go ahead. I didn't. Slice the tongue and serve.
You can use the leftovers as a topping for a chef salad, or in a sandwich with a little mustard, lettuce and tomato.

EASY CHICKEN LIVERS

                                                
How many times you looked at chicken livers in the store and said to yourself "Nah, it's too much work!" Well, it isn't. I'm giving you a basic recipe for chicken livers that you'll love and you'll have it ready in minutes. I'm not kidding, I mean literally in minutes. It's very nutritious, and since it's easy to make, you'll probably have it more often than you think. You'll need:

2 containers of fresh chicken livers (about 1.8 lb)
1 tbsp frozen onion/garlic mixture
1/2 to 1 tbsp butter
Salt and pepper to taste

Rinse the livers under running water, checking to make sure that the bile pouch (a dark green pouch about 1/2 inch long) is been removed. If not, remove it carefully so it doesn't burst and ruin the whole thing. Also remove all visible fatty parts (very small). Drain livers in a colander. In a nonstick skillet, mix the livers with the onion and garlic. Add salt and pepper. Stir over medium heat until its liquid is absorbed and the livers are browned on all sides. Make sure not to break the livers while stirring. Add 1/4 to 1/2 cup of water. Stir and let reduce to a slightly granulated sauce. Add the butter. Stir to coat. You're done.
Serve over rice pilaf and a vegetable of your choice.
NOTE: Do not add the butter while the livers are still in their liquid, it will prevent them from completely browning and will diminish the flavor.

"Don't tell anyone it's so easy" dinner.

I usually go shopping with a basic list of items that we need in the house. Staple items that we should always have in our pantries. I leave the rest of the shopping to what I find in the store: I go for what is fresh today, and sometimes this leads me to get new ideas, most of them completely out of the box. This dinner is the result of one of these excursions. I found quail at the butcher's, and I built around it a complete exotic dinner. When you tell people you're serving quail, they will definitely think that you're an accomplished chef, maybe trained in Paris. Who else would serve quail on a week night? Or maybe you had it delivered from Maxim's, also in Paris. When they'll see your proud achievement, they will never think that it was so easy to make. They'll think you slaved over it. You don't need to tell them otherwise.. nobody needs to know our secret! With the quail we're serving freek, a grain that is so easy to cook and gives you an extraordinary result, and okra. Yes okra. It's a delicious vegetable that is usually overlooked and people are afraid to serve. You will, and you'll surprise everybody.

ROASTED QUAIL AND FREEK
                                                  
Quail is a very small bird, smaller than a pigeon, that is now generally farm raised for their meat and eggs. The meat is dark, closer in color and texture to a duck's meat, without all the fat. I took a chance with this bird because of its similarity to pigeons. I grew up watching people eating pigeons and consider them a delicacy. I had my own reservations about it, mainly because of the way it was cooked: it usually had a lot of visible chopped onion in it, and this is something, as you know by now, I cannot see in my food. I thought, "Why not? I might be able of getting something out of this". The main idea was not to cook it the way I saw people traditionally prepare it. So I did: I found a simple way to prepare quail and eliminate all my apprehensions about the old way. It is also very versatile: you can cook quail over the stove, alone or in the same pan with the freek, you can cook it in the oven, buried in the freek, or even grill it inside or outside. It's up to you. You'll need:

6 birds
3 sprigs of fresh rosemary
6 sprigs of fresh thyme
2 tbsp frozen onion/garlic mixture, divided
2 tbsp olive oil, divided
Juice of 1/2 lime
Salt and pepper to taste
1 1/2 cups freek (bulgur 1/2 cut)
Chicken stock (or 2 tbsp granules or 2  bouillon cubes)

Cut the birds in half, rinse them and make sure that there are no small feathers on them. Put the birds in a bowl. Finely chop the rosemary and thyme, and add them to the bowl. Also add 1 tbsp onion/garlic mixture, salt and pepper, the lime juice and 1 tbsp oil. Mix well to coat on all sides. Set aside to marinate. In the mean time, you can prepare the okra (recipe follows). When the okra is cooking, choose a nonstick skillet large enough to hold the quail and the freek; or 2 large skillets if you decide to cook them separately. I made a one skillet dish. Heat the skillet and arrange the quail halves in it, skin side down. You don't need to put any oil, the birds are marinated in oil. When they brown on one side, turn them and let them brown on the other side.
Remove the quail to a platter. In the same skillet, add 1 tbsp oil, 1 tbsp onion/garlic mix and stir til the onions are soft. Rinse the freek, drain it and add it to the skillet. Stir for 3 to 4 minutes, then add enough liquid to barely cover the grains. If you are using the granules, add water, then stir in the granules or the bouillon cubes. The liquid should not be more than 1/2 inch over the grains. Cover and let cook until all the liquid is absorbed. Reduce the heat, stir the grains and return the quail and any liquid accumulated in the platter to the pan and try to position it in a way that it's almost covered by the freek. Add 1/2 cup of liquid, cover and let cook over low heat. When the grains are tender your dish is ready.
If you chose to cook them separately, when you brown the birds add some liquid to the skillet, bring to a boil, cover and let cook until the quail is tender, the liquid is absorbed and you have a light sauce in the pan. Cook the freek as above, without adding the quail in. Serve by putting the freek on a platter and top with the quail and its sauce.
To grill the quail, just heat an inside or outside grill, arrange the quail skin side down until it's cooked on that side without disturbing it too much, turn and let it cook til done. How easy is that?

OKRA IN TOMATO SAUCE
                                                      
Okra is a special vegetable. I grew up eating it in tomato sauce, and I was a bit taken aback when I saw how it is prepared in some countries, even here in the States. I tried it fried, but didn't like it. I honestly couldn't bring myself to try it mashed in West Africa, or chopped, elsewhere. The trick in cooking good okra is not to let it become mushy. Today I used frozen baby okra that I usually get from a Middle Eastern grocery. It's imported from Egypt and it's already cleaned for you. If you choose fresh okra, here is what you should do: rinse and drain the okra and spread it over paper towels to dry. This will help also with the small thorns that cover it. Do not cut the stem horizontally. Cut it around to make a small cone over the tip of the okra. Removing the whole thing will let the gooey thing ooze out of the okra more easily, but cutting my way will keep it from doing that. Now your okra is ready. You'll need:

1 (16 oz) bag of frozen baby okra, or 1 lb fresh okra
2 to 3 garlic cloves smashed
1 (14 oz) can tomato sauce
Juice of 1 lime
1 tbsp oil (canola or vegetable)
Salt and pepper to taste

In a sauce pan heat the oil, add the garlic and stir for a minute or so. Add the okra while not completely defrosted. Sprinkle the lime juice and stir to completely defrost and dry cook the okra, about 3 minutes. Add the tomato sauce, sprinkle with salt and pepper. Stir making sure that you don't break the okra, cover and bring to a boil. Lower the heat and let cook until the okra pods are tender. Serve as a side dish with the quail and freek.